
Foshan Fulan Laser Technology Co., Ltd.
National Hotline: 0757-29899345
Manager Wen: 18902563402
Fax: 0757-29899345
Business QQ: 2801827697
E-mail: china@fsfulan.com
Address: No.14, Leliu Port Intensive Industrial Zone, Shunde District, Foshan CityThe high-tech zone almond altar town, shunde, foshan city shun industry west road no. 15 cimc valley 20 9 / f, building B
The first step: power on and start;
Step 2: Turn on the smoke exhaust system and prepare the workbench (if the marked product is smoke-free and dust-free, this step can be ignored);
Step 3: Double-click on the industrial computer (computer) to open the marking software;
Step 4: Open the file: select the marking file→open→select the file to be marked (or create a new and edit the graphic to be marked). For details, please refer to "Laser Marking Machine Tutorial-Editing Marking Capacity";
Step 5: Fixture installation: Place the fixture (ie tooling) corresponding to the part to be marked on the table directly below the laser head, and place the marking part. (You can ignore this step if you don’t need a fixture to mark items);
Step 6: Alignment: Click the "red light" at the bottom of the mouse, and the laser head will emit a red box to shoot on the marking part, move the workpiece to make the box fall on the part to be marked, and then click to stop the "red light" after adjustment , And then fix the tooling. (Fulan Laser warmly reminds you: you must be quick when you align, and the red light should not be used for too long, so as not to shorten the life of the light-emitting head.);
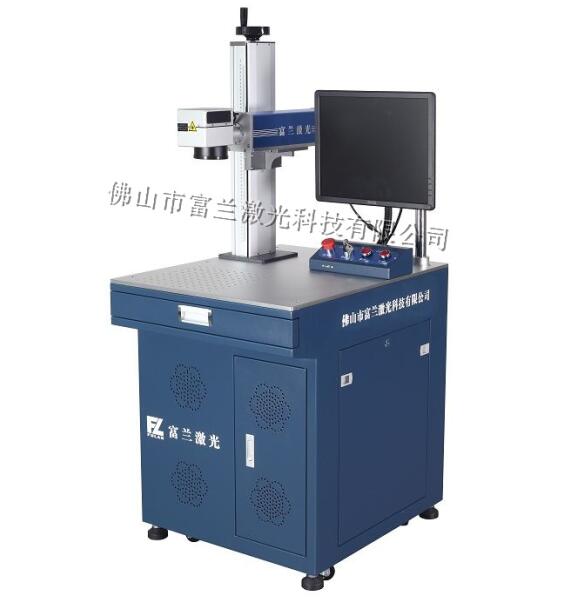
Step 7: Focusing: Place the workpiece template at the place to be marked, then check the continuous marking, mouse click "Continuous Machining", then click "Marking", shake the handle to adjust the Y-axis lift, until the laser acts on the workpiece When the upper energy is the strongest, the sound is the clearest, and the color is the brightest, it is basically the focal length. (Foshan Fulan Laser editor here kindly reminds you: "Continuous processing" is only used for focusing. After you have adjusted the focus, please remember to turn off "Continuous processing" before operating.);
Step 8: Trial engraving and parameter adjustment (that is, machine adjustment): Observe the marks after trial engraving (Foshan Fulan Laser Technology Co., Ltd. recommends that you use unqualified parts or scraps of the same material and height to try engraving to avoid marking Bad, resulting in waste), by adjusting the marking parameters to make the marking achieve the desired effect;
Step 9: After the test is OK, you can press the "Mark (F2)" button or step on the foot switch to start marking. (To mark multiple workpieces, just repeat this step);
The above is the first marking of the product. The page including graphics and marking parameters should be saved into a file, and the height of the laser head and the marking surface should be measured. The file should be called out from the computer and the height should be directly aligned during the next processing. Can be marked.
Quality assurance, full service!
Let the value of equipment exceed customer expectations!
Manager Wen: 18902563402

Scan Mobile Version |


